Creating a New Project
In this chapter you will learn how to properly set up a project for developing a file type plug-in.
Create the Project
Before you start developing plug-ins for Trados Studio, you should make sure that the SDK is installed on your development computer. The SDK installer will add new templates to your Microsoft Visual Studio environment, as illustrated in the screenshot below. For the type of plug-in discussed in this chapter, we require the Trados Studio Plug-in Project template.

By default, when you create a project based on this template, the project name will be e.g. Trados Studio Plug-in Project1. Change the project name to Sdl.Sdk.FileTypeSupport.Samples.SimpleText for our sample implementation.
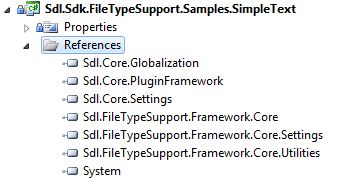
Add the Required References
The plug-in template will come with the Sdl.Core.PluginFramework.dll reference. For our file type plug-in implementation, we also need to reference the File Type Support Framework, i.e. Sdl.FileTypeSupport.Framework.Core.dll. For implementing the functionality required by our example, you need to add the libraries used for integration with Trados Studio, which are as follows:
- Sdl.FileTypeSupport.Framework.Core.Settings.dll
- Sdl.Core.Settings.dll
- Sdl.Core.Globalization.dll
- Sdl.FileTypeSupport.Framework.Core.Utilities
By default these files can be found in the installation folder of Trados Studio, i.e. C:\Program Files (x86)\Trados\Trados Studio\Studio18. The 'Copy Local' property for these references should be set to True.
Note
Do not forget to sign the assembly. Otherwise, your plug-in might not be loaded by Trados Studio
See Also
What is the Verification Framework?
Note
This content may be out-of-date. To check the latest information on this topic, inspect the libraries using the Visual Studio Object Browser.